React-03 组件通讯、生命周期
一、组件通讯
父传子
传值:在子组件标签上,定义一个变量,并赋值需要传入的值
<Home msg={this.state.msg} />
- 函数创建接收方式:第一个形参接收props;
function Home(props){}
- 类创建接收方式
class Home extends React.Component{
    constructor(props){
        super(props)  //props是react定义的属性,不建议使用其他名
    } // 这里如果不写props,也是可以使用this.props直接取值的,建议写上;
}
react中传入的值不受限制,可以是任何类型的值,比如:事件、组件都可;
props类型验证
使用:react将prop-types分离出来一个组件了,想使用时可以直接引入,不需要再安装
import React from 'react'
import PropTypes from 'prop-types'
class MyComponent extends React.Component {
    static propTypes = {} // 在这里定义类型
}

// 或者在这定义类型
MyComponent.propTypes = {}
PropTypes常用类型验证的属性:
{
    PropTypes.array,
    PropTypes.bool,
    PropTypes.func,
    PropTypes.number,
    PropTypes.object,
    PropTypes.string,
    PropTypes.element, // 如:<MyComponent />
    PropTypes.elementType, // 如 Mycomponent
    PropTypes.oneOf(['News', 'Photos']), // 其中一个
    PropTypes.oneOfType([
        PropTypes.string,
        PropTypes.number,
    ]),
    PropTypes.any
}
所有的类型都可以添加一个isRequired以添加一个警告,如:PropTypes.number.isRequired;
更多验证:prop-types
props默认值,如果没有传入Props,则默认是null
props的默认值可以使用类的defaultProps属性定义
class Example extends React.Component {
 // ...
}
Example.defaultProps = {
    color: 'blue'
}

//or
class Example extends React.Component {
    static defaultProps = {
        cache: false
    }
}
隔代传值
父组件通过定义childContextTypes和getChildContext来定义要传入的方法或属性,
子组件通过定义contextTypes验证类型,之后通过context获取
import PropTypes from 'prop-types'
// 父组件
class Parent extends React.Component {
    static childContextTypes = {
        color: PropTypes.string
    }
    getChildContext(){
        return {
            color: 'red'
        }
    }
    render(){
        return <Child1 />
    }
}
// child1
const Child1 = () => {
    return <div>Child1 <Child2 /> </div>
}

// child2
// 函数组件接收
const Child2 = (props, context) => {
    console.log(context.color)
    return <div></div>
}
Child2.contextTypes = {
    color: PropTypes.string // 必须验证类型, 否则没有数据
}

// 类组件接收
class Child2 extends React.Component {
    constructor(props, context){
        super(props, context) // 第二个为context, 也可以直接...args;
    }
}
传入组件
传入组件的好处比传入名字的好处,可以直接将父组件里面的state传过去;
<Son branch={<Branch count={this.state.count} />} /> // 传入组件
<Son branchComponent={Branch} /> // 传入组件名字

// 渲染时
return (
    <div>
        {props.branch}
    </div>
)
props.children
在组件标签中间要显示的内容
<Child>中间的内容</Child>
在组件中,使用{this.props.children}代替位置;
children还可以是一个对象,相当于vue里面的具名插槽(只要是合法的js表达式都是可行的,放在内容中比在标签中传入可读性更好;)
function Dialog(props) {
    return (
    	<>{this.props.children.default}</>
    )
}

export default function() {
    return (
        <Dialog>
			{{
        		default: (<div>弹出组件</div>),
        		footer: (<div>底部内容 </div>)
    		}}
		</Dialog>
    )
}
children也可以是一个函数:
当父组件里面的包裹的内容需要依赖子组件的参数时,可以使用函数形式;类似vue里面的slot插槽作用域
class ClassWithRenderProp extends React.Component {
  myRef = React.createRef();
  componentDidMount() {
    doSomething(this.myRef.current);
  }
  render() {
    return this.props.children(this.myRef);
  }
}

class ClassParent extends React.Component {
  render() {
    return (
      <ClassWithRenderProp>
        {myRef => <Button ref={myRef} />}
      </ClassWithRenderProp>
    );
  }
}
修改children
children如果是jsx传入的,只能是只读的,不能直接修改,如果需要修改的话,需要用react提供的其他方法
修改属性只能是先克隆节点,再修改
React.Children是react提供的Api,第一个参数传入children,第二个参数是map函数;
下面的例子使用RadioGroup组绑定子元素的所有name属性;
function RadioGroup(props) {
    return (
        <div>
        	{React.Children.map(props.children, radio => {
                // 第一个参数是要克隆的值,第二个参数是要修改的属性
                return React.cloneElement(radio, {name: props.name})
            })}
        </div>
    )
}
function Radio({children, ...rest}) {
    return (
    	<div>
        	<input type='radio' {...rest} /></inpu>
        	{children}
        </div>
    )
}

function FormComponent() {
    return (
    	<RadioGroup name='categray'>
        	<Radio value='vue'>vue</Radio>
        </RadioGroup>
    )
}
子传父
class 组件
class组件中,直接给子组件绑定ref获取实例,并直接调用子组件中的事件;
// Children.jsx
class Children extends React.Component {
    state = { name: 'children' }
	handleClick = () => {
        console.log(this.state.name)
    }
    render(){
        return <div>children组件</div>
    }
}

// Parent.jsx
class Parent extends React.Component {
    childRef = React.createRef()
	printChild = () => {
        this.childRef.handleClick()
    }
    render(){
        return (
        	<div>
            	<Children ref={childRef} />
                <button></button>
            </div>
        )
    }
}
函数组件
函数组件可以通过hooks的新特性,使用useImperativeHandle传参,将参数传给父元素
// parent
const Parent = () => {
    const childRef = createRef(null)
    return <Children ref={childRef} />
}

// Children
const Children = React.forwardRef((props, ref) => {
    React.useImperativeHandle(ref,() => ({}), [])
    return <div></div>
})
组件跨层级通信 - Context
Context有两个 值
- 一个是Provider是外层提供数据的组件 ,绑定value来传入 值 ;
- 一个是Consumer是内层获取数据的组件 ,需要传入一个函数 ,Consumer接收Provider传入 的值 ,并返回一个组件 用于渲染 ;
import React from 'react'
const Context = React.createContext();
const Provider = Context.Provider
const Consumer = Context.Consumer

const Child = props => <div onClick={props.add()}></div>
class ContextTest extends React.Component {
    state = {counter: 0}
	add = () => this.setState({counter: this.state.counter + 1})
    render() {
        return (
        	<Provider value={{counter: this.state.counter, add: this.add}}>
            	<Consumer>
                	{ value => <Child {...value} /> }
                </Consumer>
            </Provider>
        )
    }
}
二、生命周期
官网链接直通车:react生命周期;
使用生命周期必须放在类里面,函数没有生命周期;
生命周期从出生到死亡的一个过程,从创建到销毁,在React中,从挂载开始;
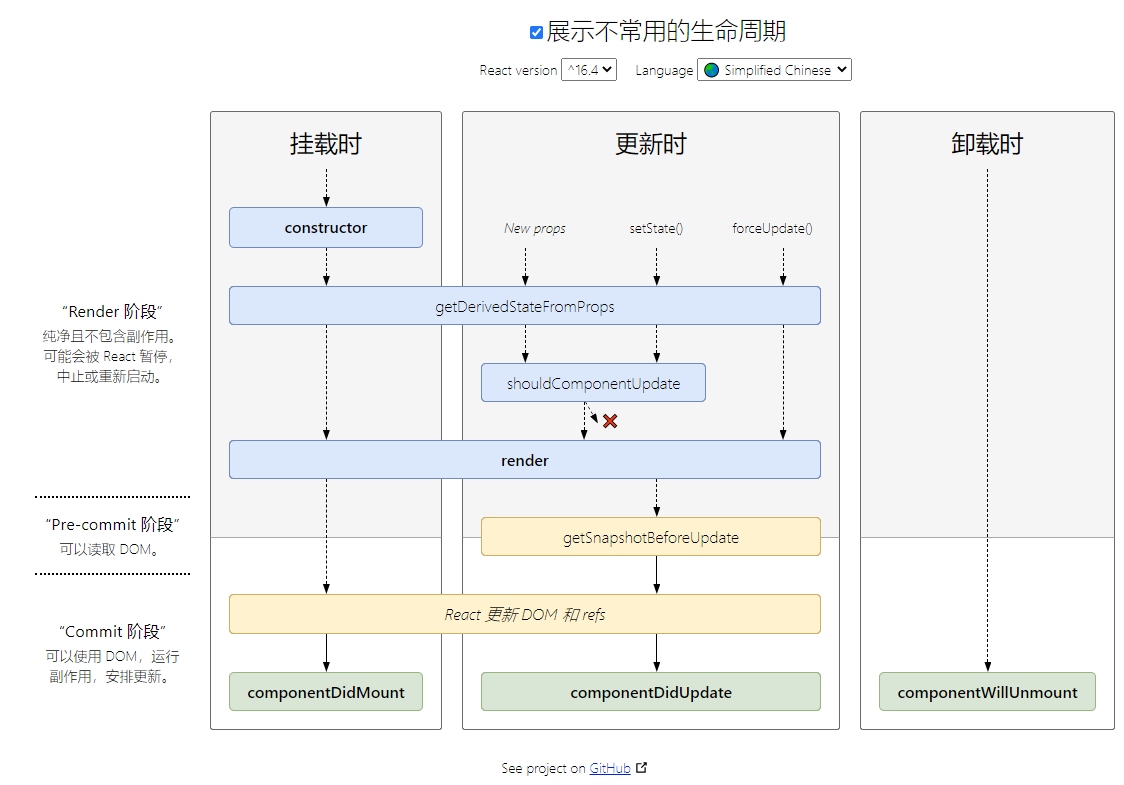
初始化渲染阶段
constructor初始化static getDerivedStateFromProps(props, state)应该返回一个对象来更新state,如果返回null则不更新任何内容render(){}渲染;componentDidMount(){}已经挂载,在这个阶段调取ajax;
更新阶段
static getDerivedStateFromProps(nextProps,prevState){}返回结果会被送给setState;shouldcomponentUpdate(nextProps, nextState){}是否要更新;componentWillReceiveProps(nextProps, nextState){}在接收新的props之前被调用;通过调用this.props和nextProps来替换;(只有在props更新才会被调用,初始不会调用)
shouldComponentUpdate(nextProps, nextState){}:该函数有两个形参,更新的props对象和更新的state对象,在该函数里面填写大量逻辑,决定是否渲染页面;达到自己想要的结果;
react页面一进入触发的生命周期函数:初始化-->更新state-->渲染-->挂载
当数据发生改变时,触发的生命周期函数,分为两种状态,是否有shouldComponentUpdate这个函数:
(1)不存在:数据正常更新,触发三个函数:将要更新-->渲染-->更新
(2)存在:数据被拦截,必须返回布尔值,否则报错此时也分为两种情况:
- return true:更新数据;生命周期顺序:是否要更新-->将要更新-->渲染-->更新
- return false:拦截更新,不渲染页面,此时数据仍是最新的状态;
错误阶段
static getDerivedStateFromError(err){}直接返回一个对象, 用来修改state值;componentDidCatch(err,info){}捕获错误
区别:
在render phase 里产生异常的时候,会调用getDerivedStateFromError;
在commit phase 里产生的异常会调用componentDidCatch;
componentDidCatch是不会在服务器渲染的时候被调用的,getDerivedStateFromError而会
卸载阶段
componentWillUnmount()从dom卸载组件后调用,用于清理内存空间;
getSnapshotBeforeUpdate
getSnapshotBeforeUpdate(prevProps, prevState)
在最近一次渲染输出(提交到 DOM 节点)之前调用。一般用于滚动位置使用(一般需要更新以后再做处理),此生命周期的任何返回值将作为参数传递给 componentDidUpdate()。
注意:使用getSnapshotBeforeUpdate必须使用componentDidUpdate
class ScrollingList extends React.Component {
  constructor(props) {
    super(props);
    this.listRef = React.createRef();
  }

  getSnapshotBeforeUpdate(prevProps, prevState) {
    // 我们是否在 list 中添加新的 items ?
    // 捕获滚动位置以便我们稍后调整滚动位置。
    if (prevProps.list.length < this.props.list.length) {
      const list = this.listRef.current;
      return list.scrollHeight - list.scrollTop;
    }
    return null;
  }

  componentDidUpdate(prevProps, prevState, snapshot) {
    // 如果我们 snapshot 有值,说明我们刚刚添加了新的 items,
    // 调整滚动位置使得这些新 items 不会将旧的 items 推出视图。
    //(这里的 snapshot 是 getSnapshotBeforeUpdate 的返回值)
    if (snapshot !== null) {
      const list = this.listRef.current;
      list.scrollTop = list.scrollHeight - snapshot;
    }
  }

  render() {
    return (
      <div ref={this.listRef}>{/* ...contents... */}</div>
    );
  }
}
forceUpdate
调用this.forceUpdate()将致使组件调用render方法,此操作会跳过shouldComponentUpdate(),但其子组件会触发正常的生命周期方法;
过期的生命周期
过期不建议使用,但是使用不报错;
componentWillMountcomponentWilReceiveProps:可以使用getDerivedStateFromProps代替componentWillUpdate
生命周期图谱
在线地址:https://projects.wojtekmaj.pl/react-lifecycle-methods-diagram/
三、表单元素
表单元素分为两种:
受控组件
受控组件是由状态State控制的;
受控组件当中的value值是直接绑定到state中的;
onSubmit=e=>{
    e.preventDefault(); // 阻止表单提交事件刷新
}
<form onSubmit={onSubmit}>
    <input
        type='text'
        value={this.state.value}
        onChange={e => this.setState(e.target.value)}
    />
    <input type='submit'>提交</input> // 触发submit事件
</form>
非受控组件
当input过多时,受控组件就很麻烦了,就可以使用非受控组件;
非受控组件是通过ref来控制的;
非受控组件是通过dom元素访问的,非受控组件是不能通过state状态操作的;
class Forms extends React.Component {
    constructor(){
        super()
        this.username = React.createRef()
        this.password = React.createRef()
    }
    clickHandler () {
        console.log(this.username.current.value)
    }
    render () {
        return {
            <>
                <input type='text' ref={this.username} />
                <input type='password' ref={this.password} />
                <button onClick={this.clickHandler}>提交</button>
            </>
        }
    }
}
event
如果需要异步访问event,需要在函数顶部添加e.persist()
直接访问则不需要添加该函数,直接访问属于直接取e.target
<div onClick={e => {
        e.persist()
        console.log(e.target)
    }}></div>
六、调用接口
- axios(在app入口文件填写),需要绑定在axios上
import axios from 'axios'
React.Component.prototype.$http = axios
- jquery
import jquery from 'jquery'
Component.prototype.$jq = jquery
- jsonp代理跨域
在package.json文件,在最后面,添加以下代码,之后重启
"proxy":"http:baidu.com"
在请求ajax时,直接填写/号后面的path路径即可;
七、ref
获取dom元素
字符串形式的ref API(this.refs.元素形式)有些许缺点,不建议使用,建议使用回调方式获取ref;
function App(){
    const myRef = React.createRef()
    React.useEffect(()=>{
        console.log(myRef.current)
    },[])
    return <div ref={myRef}></div>
}
- ref也可以直接是函数
function App(){
    const [height, setHeight] = useState(0)
    const measureRef = useCallback(node => {
        if (node !== null) {
            setHeight(node.getBoundingClientRect().height)
        }
    }, [])
    return (<div ref={measureRef}></div>)
}
- ref作为子组件的属性,获取的是该子组件,函数组件使用forwardRef,函数组件不能直接使用ref是因为函数组件没有实例
// 函数  使用forwardRef
const Child = React.forwardRef((props,ref)=><div ref={ref}>子组件</div>)

// 类
class Child extends React.Comopnent{
    render(){
        return <div>子组件</div>
    }
}

function App(){
    const myRef = React.createRef()
    React.useEffect(()=>{
        console.log(myRef.current)
    },[])
    return <Child ref={myRef} />
}
高阶组件使用ref
// 使用logProps包裹
function logProps(Component){
    class LogProps extends React.Component {
        render(){
            const {forwardedRef, ...rest} = this.props
            return <Component ref={forwardedRef} {...rest} />
        }
    }
    return React.forwardRef((props, ref)=>{
        return <LogProps forwardedRef={ref} {...props} />
    })
}
class Child extend Component {
    render () {
        return <div>{this.props.txt}</div>
    }
}
class Parent extends Component {
    state = {
        myRef: React.createRef()
    }
    componentDidMount(){
        console.log(this.state.myRef)
    }
    render(){
        return <LogChild ref={this.state.myRef} txt='1111111'/>
    }
}
- 使用redux包裹的connect组件获取ref
子组件添加withRef:true;
connect(mapStateToProps, mapDispatchToProps, null, {withRef: true})(Son)
父组件调用:

this.refs.child.getWrappedInstance() // 可以获取到子组件;